
Hello everybody!
I’m back, and this week I’m showing you how to make this DIY Menu Planner. It’s really easy to make and you’ll probably already have most of what you need at home.
What you’ll need:
- Piece of cardboard
- Coloured Paper
- Clothespins
- Plastic cup/bottle of some sort
- Glue
- Scissors
- Tape
Step 1: The cardboard
Cut a piece of cardboard to the size of your liking. Mine was 18x 29 centimetres but you can make it bigger or smaller if you want. Then take some coloured paper and wrap the cardboard with it. Use tape to secure the paper to the cardboard.


Step 2: Adding the clothespins
I got pins with the days of the week on the back from a craft store, but of course, you can just use regular pins and write/stamp the days on them. Align the pins in a row on the left side of the paper, making sure there are equal spaces between them.

Step 3: Adding the cup
For this step, take any kind of small plastic cup. You could also use a plastic bottle and cut off the top half. Then cut the trough the cup horizontally with a pair of scissors. Be careful though, you don’t want to hurt yourself.


After you’ve done that use some glue to stick the half cup to the right bottom of the planner
Step 4: Making the dish cards
For this step, you’ll need some coloured paper. I used memo cards because they were already the same length but normal paper will do just fine. Then, cut the paper into little streaks of the same lenght.


The next step is to write the names of the dishes onto the papers. I decided to categorize them into five categories: Asian, Italian, Soups, Other and Easy.
When writing make sure to keep to the right side of the paper or you won’t be able to see it! ( I might have written over 10 papers before I realised this…)
Step 5: Putting everything together.
Put the papers with the dishes you want to make in the clothespins and the rest in the cup.
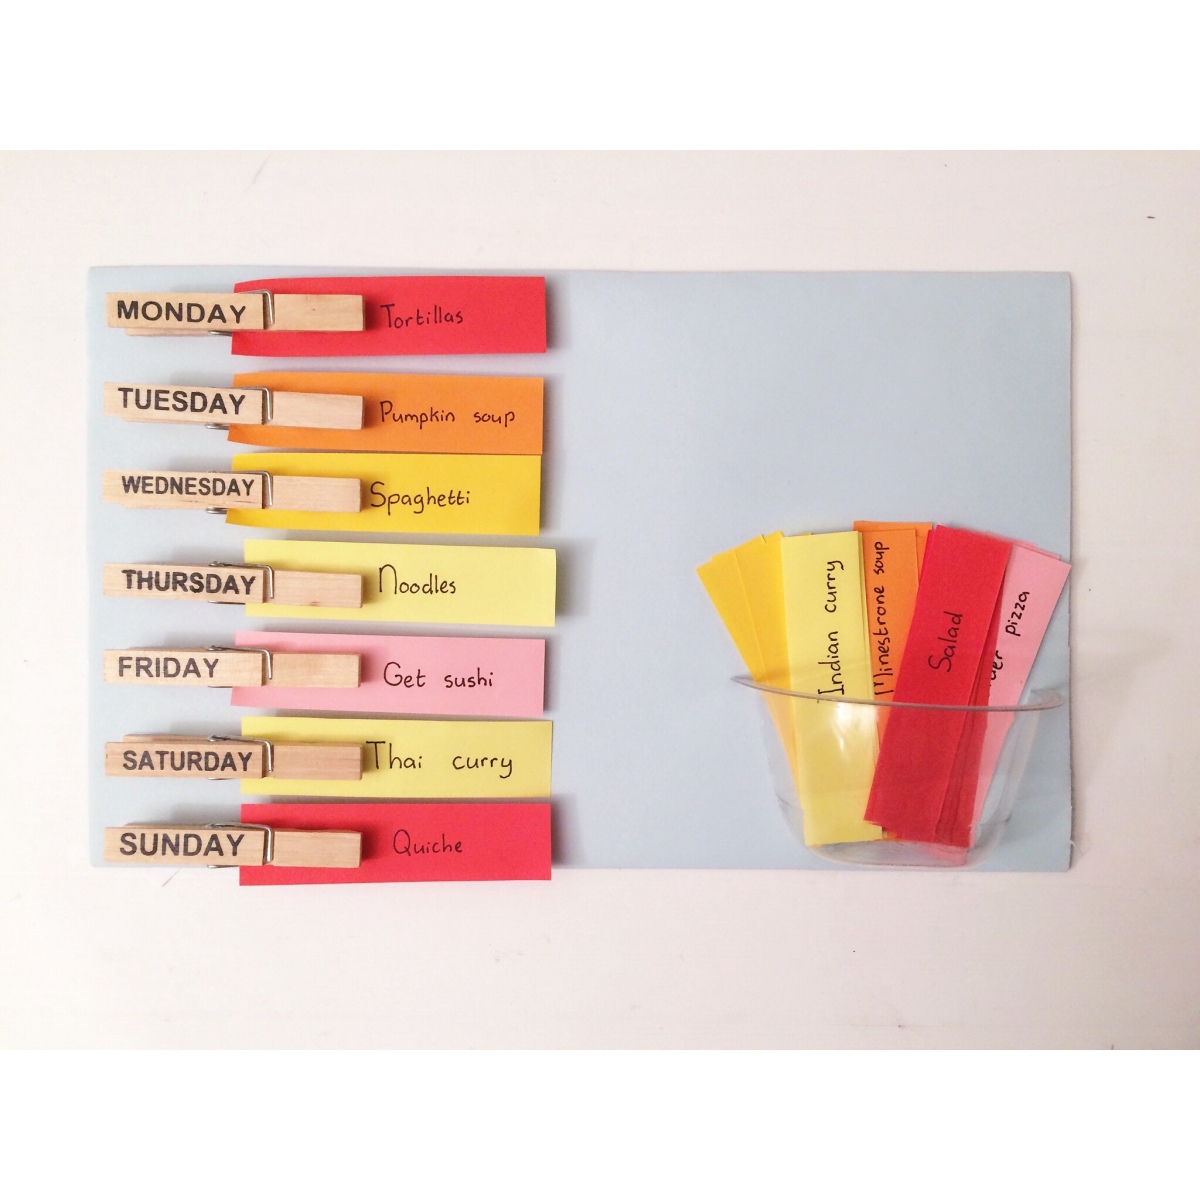
As a finishing touch, I printed out the word Menu and stuck it in the right top.
I hope you like it! It’s so easy to make yet really useful. You can easily make a new menu every week and if you colour-code it you can make sure you get enough variety. Plus I think it looks pretty cute! What do you think?
I hope you enjoyed this tutorial. If you did, please like, comment and/or share. I would really appreciate that. And follow me for more DIYs and creative content!
xxx, Yara

This is so cool! I love it.
LikeLiked by 3 people
Thank you!
LikeLiked by 1 person
You’re welcome!!!!!!!
LikeLiked by 1 person
This is so cute and creative. Wow
LikeLiked by 1 person
super cute and simple, I love it!! Great DIY!
LikeLiked by 3 people
I’m glad you like it!
LikeLiked by 1 person
This is really cute and practical! I might give it a go!
LikeLiked by 2 people
I’m glad you like it!
LikeLiked by 1 person
This is so cute, and what a great idea! 😀 I love it.
LikeLiked by 1 person
Thank you, I’m glad you like it!
LikeLiked by 1 person
This is an amazing idea and I am extremely excited and looking forward to try it out! Thank you for sharing this incredible idea!
LikeLiked by 1 person
No problem, I’m glad you like it!
LikeLike
Very nice idea, simple enough for me. Thanks! -Dominique
LikeLiked by 1 person
I’m glad you like it
LikeLiked by 1 person
💚 You might want to check my 3C Crush post! Have a great weekend.
LikeLiked by 1 person
Thanks for linking to my post!
LikeLiked by 1 person
My pleasure!
LikeLiked by 1 person
Love this
LikeLiked by 1 person
Thanks
LikeLike
This would be fun to do with my kids:) They could help me come up with meal ideas and put all the pieces together. Thanks for the inspiration!
LikeLiked by 2 people
Yeah that is a great idea, I’n sure it would be a lot of fun!
LikeLiked by 1 person
Cutest planner ever! Awesome of you to share your talents! Happy New Year! 🙂
LikeLiked by 1 person
Thank you!
LikeLiked by 1 person
nice idea!
LikeLiked by 1 person
Thanks
LikeLike
This diy is adorable…❤️
LikeLiked by 1 person
Thanks
LikeLiked by 1 person
That was a great and clearly written up DIY! I can’t wait to try it.
LikeLiked by 1 person
Thanks!
LikeLike
This is amazing! I’ve been looking for something like this for months. Thank You!
LikeLiked by 1 person
I’m glad you like it
LikeLike
nice blog
https://factsworld637213243.wordpress.com please do visit my blog too m a beginner need ur support i hpoe u woud like my blog
Like share comment…
LikeLiked by 1 person
Thanks
LikeLiked by 1 person
I love this idea!!! I’m constantly making charts for each week and so on. Having this will really cut down on meal planning for the week. Brilliant!
LikeLiked by 1 person
I’m glad you like it!
LikeLike
Very orignal and cute!!
LikeLiked by 1 person
Thanks
LikeLike
Such a cute idea! Love it!
LikeLiked by 1 person
Thanks
LikeLike
This is really cute. So happens just the other day I was having my son who is 9 who is a very picker eater, make his IDEAL MEAL MENU. Maybe if I tried to spruce it up a bit he would get into it more. Then hopefully try new foods. Thanks for sharing!
LikeLiked by 1 person
I’m glad you like it!
LikeLike